Search This Blog

Thursday, 3 May 2018

Statistics basics - 1


if("you are an absolute beginner in data science") 
{
        One simple line which summarizes the various works in data industry is "Data Science, Data   Analytics, Machine learning etc are different sides of the same multi-sided polygon".
        If you are aiming to step into any of these a strong understanding of statistics will help to pioneer. Statistics expertise is mandatory for data scientist, machine learning experts where as basic is OK for other roles.
       Role of statistics in understanding, analyzing, automated decision taking is inseparable. So, Set your mind to read, learn, understand and apply statistics to see great success in data industry.
}
.....................
      To construct a giant, sustainable building, its foundation should be strong. similarly, strong understanding of statistics is necessary for anybody in data industry. so, let strengthen the basics of statistics.
will touch up on:
  1. Central Tendency
  2. variance, standard deviation
  3. Distributions, Normal distribution
  4. Confidence intervals, degrees of freedom
1. Central Tendency:
          A measure of central tendency is a single value that attempts to describe a set of data by identifying the central position within that set of data.They are also classed as summary statistics. The mean (often called the average) is most likely the measure of central tendency that you are most familiar with, but there are others, such as the median and the mode.
a. Mean(Average)
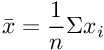
        The mean is equal to the sum of all the values in the data set divided by the number of values in the data set. So, if we have n values in a data set and they have values x1, x2, ..., xn, the sample mean, usually denoted by  (pronounced x bar), is:
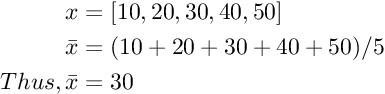
Ex: Mean for a given set can be computed as follows: 
  • Mean can be calculated for both continuous and discrete data as well.
  • It is the only center tendency measure which considers each data input.
  • It suffers with Outliers.
b. Median
       Median is the middle value in a sorted data set. For a data set with even number no.of elements, average of both the values will be the median
x = [23, 40, 6, 74, 38, 1, 70]
sorted_x = [1, 6, 23, 38, 40, 70, 74]

Median is 38.
  • unlike mean, it doesn't suffer much because of  outliers
c. Mode
         Most common value in the data set. Mode is most useful when you need to understand clustering or number of ‘hits’. For example, a retailer may want to understand the mode of sizes purchased so that he can set stocking labels optimally. Say, store A has a mode of ‘small’ while store B has a mode of ‘XXL’.

Based on type of variables, we need to choose the right central tendency measure. Cheat sheet for it is,
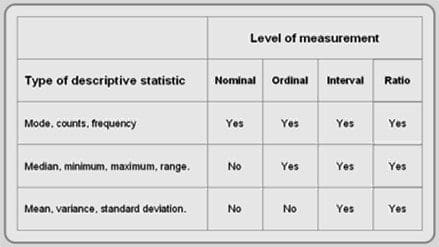
statistics-levels-measurement-table 
 Read about types of variables here.

Now, we have read about measures of central tendency. i.e. What is the central value of the data set. It talks about center values, doesn't talk about how data was spread. To understand that, we need to consider,
  1. Variance(σ^2)
  2. Standard Deviation (σ)
Unlike range and quartiles, the variance combines all the values in a data set to produce a measure of spread.
 1. Variance
variance is a measure of how spread out a data set is.Variance is the average of the squared differences from the mean. 

Variance (S2) = average squared deviation of values from mean
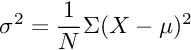
Difference is squared to avoid cancelling of values above mean and below mean.
As the inputs are squared, units are not same for Variance and the data. 
Standard Deviation, is the Square root of the variance.

2. Standard Deviation:(σ)
        It measures spread around the mean. Because of its close links with the mean, standard deviation can be greatly affected if the mean gives a poor measure of central tendency. Understanding Standard deviation is very important to understand the data spread. its the one referred in six sigma technique.
       The data set with the smaller standard deviation has a narrower spread of measurements around the mean and therefore usually has comparatively fewer high or low values. An item selected at random from a data set whose standard deviation is low has a better chance of being close to the mean than an item from a data set whose standard deviation is higher.
Generally, the more widely spread the values are, the larger the standard deviation is.
 
       Although standard deviation is less susceptible to extreme values than the range, standard deviation is still more sensitive than the semi-quartile range. If the possibility of high values (outliers) presents itself, then the standard deviation should be supplemented by the semi-quartile range.


If x bar = mean, σ = standard deviation and x = a value in the data set, then
  • about 68% of the data lie in the interval: mean - σ < x < mean + σ.
  • about 95% of the data lie in the interval: mean - 2σ < x <mean + 2σ.
  • about 99% of the data lie in the interval: mean - 3σ < x < mean + 3σ.
Next Posts:
3. Distributions and Normal distribution:


4. Confidence intervals, degrees of freedom

Friday, 16 March 2018

Flutter and Dart


Google has released a new Hybrid framework for developing mobile apps named FLUTTER. It’s based on their new programming language called DART.
It’s official website: https://flutter.io/ . As it is hybrid don’t think as like cordova but non-cordova i.e. no-bridging (external) SDK.

Its inspired by FB’s react native but it takes hybrid apps to another level in terms of performance and development speed. Here is a detailed analysis, don’t miss it. Article focuses on the anatomy of Dart and Flutter.

A point of note is that google claiming it will be a big hit as it is not just for mobile but it revolutionizes web development.  Dart 2 is out now and It’s interesting…

Friday, 23 February 2018

fix bootstrap errors with angular 4

Uninstall bootstrap@4.0.0-beta.3:
npm uninstall bootstrap --save
Then installed bootstrap@4.0.0-beta.2:
npm install bootstrap@4.0.0-beta.2 --save

OR 

upgrade angular cli from 1.6.3 to 1.7.0-rc.0. but this has some problems with fonts

but issues coming up with both, click events aren't working for hamburger in mobile view.

so, i finally felt better to go with ng-bootstrap or the mdbootstrap (material design). material isn't yet in a production mode. 

here are the steps to install ng-bootstrap.

  1.  npm install --save @ng-bootstrap/ng-bootstrap
  2. add the following to algular-cli.json - styles:[], so it would be styles:["../node_modules/bootstrap/dist/css/bootstrap.min.css", "styles.css"]
  3. start using the angular bootstrap components looking at: https://ng-bootstrap.github.io/#/getting-started 


Saturday, 28 October 2017

switch between DEV, QA and PROD easily in angular 4/ionic 3

While building any apps its important for a developer to switch between the environments.
below is a simple way i felt for switching environment in angular 2/4 or ionic 2/3.

its easy with a provider and associative arrays. below is an example:

create a provider called environments and use the below:

_envs = {
dev:{
baseURL:"https://somedev.exaple.net/api/mobile",
    config:{
    serviceRefName:"/demo1",
    serviceRefname2:"/demo2",
    serviceRefname3:"/demo3",
    //...
    //...
    }
}
    qa:{
    baseURL:"https://someqa.exaple.net/api/mobile",
    config:{
    serviceRefName:"/demo1",
    serviceRefname2:"/demo2",
    serviceRefname3:"/demo3",
    //...
    //...
    }
    },
    prod:{
    baseURL:"https://someprod.exaple.net/api/mobile",
    config:{
    serviceRefName:"/demo1",
    serviceRefname2:"/demo2",
    serviceRefname3:"/demo3",
    //...
    //...
    }
    }
 };

 _env={};
 _selectedEnv = "qa";

 //add this line in constructor
 this._env = this._envs[this._selectedEnv];

 //add this method to the environment provider
 getURL(configUrl){
    console.log("configUrl Sec : "+configUrl);
    //console.log("this._env="+JSON.stringify(this._env));
    console.log("URL="+this._env["baseURL"]+this._env["config"][configUrl]);
    return this._env["baseURL"]+this._env["config"][configUrl];
  }

In components, where you want to call a service,

  • add environment provider dependency
  • use this:  this.environment.getURL("YourSericeName")
for ex: this.environment.getURL("serviceRefname3")

whenever you need to change, simple change the _selectEnv in you Environment provider.
 For ex:
 _selectedEnv = "prod";

It will take the service names from prod obj of _env. this way with a very simple step, you can switch environment in angular.

Note: It has nothing much specific to angular. this logic can be used in any programming language with respective object constructs.

Monday, 9 October 2017

MODS 17


OCT 5
  • A11Y - for accessibility not disability 
    • tota11y.com,  a11y.org, koa11y.tool
  • Scott Davis company - Thirsty Head
  • Future is all micro services, currently its all monolithic
  • Kubernetes - IBM's ., container orchestration
  • Swift for web
    • REPL
    • Chris Latner is a genius
    • Protocol oriented
    • LLVM?
    • CodableProtocol - Swift 4 JSON type
    • TaskStorage - delete, save etc 4 props
  • Kitura
    • Open API 2.0 Spec - swagger
  • React Native
    • DogFooding
    • Hot Reloading
    • Configuring instant updates?
    • Expo - Dev tool
      • expo kit for managing custom needs
      • CRNA
    • Testing:
      • Jest - Snapshot Testing
      • Enzyme
    • StoryBook
      • Interactive Dev & Testing
      • Loki - Visual Regression Testing
      • Monkey Runner tests
    • Build & Deploy:
      • fastlane
  • Tools:
    • Lottie - Animations
    • Crashlytics, Sentry
    • Expo Snack
    • Detox - replacement for appium/selenium
    • appitools - Visual automated testing
    • Open STF - for certain devices testing
    • Electrode native - convert to react
  • Building for Next Billion  Users:
    • about PWA's
    • Performance in google chrome set to slow 3G 
    • In slow 3g expected performance:
      • First meaningful paint - 1.6s
      • Time to interactive - 2.5s
      • Page Ready - 3.6s
  • React with GraphQL & Apollo:
    • Redux - State Management
    • Graph QL is server side, which decouples Server endpoints and client
    • GraphQL
      • Only one end point will be there 
      • Client has to query details it needs and GraphQL will call corresponding service/db and executes a query and returns queried data.
      • Its kind of agreement between client and server so, client need not bother about service side changes. it will always return the details queried by the client and in the same format as the query.
      • Query - Read, Mutation - Write, Subscription - Push
      • cycle: Query -> Resolvers (Functions to calculate how to fetch data) -> Connectors
    • Apollo:
      • Client side for GraphQL mostly. it replaces the need for Relay.
OCT 6
  • Data - J.Paul Getty's quote
  • Deep leaning:
    • Yousha Bengio book on deep learning
    • Super long sequence pattern recognition
    • Alpha GO -by google
    • Over fitting in Neural networks
  • BFF (Backend for frontend) with swift:
    • Micro services
    • Be part of swift evolution - Chris Latner
    • Swift on linux works on Ubuntu 14.0 onwards, linux one server platform and android platform as well
    • Foundation & Dispatch are in progress for apple & Linux platforms
    • Web service frame works based on swift are  - Kitura, Perfect, Vapour
    • Swift is best for web interms of performace and storage when compared with Node, Java
  • Citizen Data Scientist:
    • epilipsy?
    • Lyfas
    • ibm.biz/heartmotion - ibm's project
    • PCA - principle component analysis
    • Data science experience in Bluemix
  • Deep Learning by (methods)
    • blundering - experimentation
    • transfer learning - japan cucumber example
    • Simulation
  • Swift Stack developer is a upcoming profile
  • Robust introduction AI:
    • Recurrent neural networks
    • Tensor layer
  • Appless environment:
    • Conversational UI
      • Intents
      • Entity
      • Action
    • Cloud functions (Google) & Lamda (AWS)
    • Siri - apple, Google Assistant - Google, Amazon - Alexa
    • console.actions.google.com - for cloud functions
    • Amazon echo, echo dot,
    • Earcon instead of icon
    • Siri kit by apple for ConvoUI
    • Chat bubbles - Response
    • Mood Analysis - Urgency etc
    • Seamless UI - b/w devices etc
  • RxJS: @ladyleet
    • IxJS - Matt Podwyski is working on
    • Sync .of, .from  -synchronus functions in Rx
    • .share?
    • SpeechRecognition - mozilla/api/web_search_api
    • .switchmap?
    • .merge?
  • Native Script:
    • from teleric like react
    • snippets plugin for easy coding of native script in atom


Sunday, 26 February 2017

Ionic 2 - Hello World!!

After installing Ionic 2, let start coding with it. Ionic 2 project creation is not much different form ionic 1. it uses the same CLI. so, lets issue the command to create the project

ionic start ItsMyCodeShare --v2
so, this creates a blank ionic 2 project. to see it, run the same serve command after going to the project folder:
ionic serve

this will open your project normally with this URL: http://localhost:8100/ with 3 tabs.

let us understand how ionic 2 project structure and how is it rendering your page on to the WebView.
after creating the blank project your folder structure will look like this:

config.xml, src, www are important for development. forget the rest for now.
config.xml contains all the spec, preferences, plugins for each platform.
src contains the source code that we are going to develop.
www contains the transpiled code. 

src contains below folders based on what all will be used:
app
pages
providers
components
pipes

initially it contains only pages folder as the other were not yet created.
app: is the key folder where the app will be initialised. it contains
app.components.ts - this is the file where app starts (after index.html upto my understanding)
app.html - contains the root nav i.e. a placeholder for all navigation of the app
app.module.ts - all the app components, pages, providers to be declared soon after generating them.
app.scss - contains the style for app.html
main.ts 

app.html has <ion-nav [root]="rootPage"></ion-nav>. this ion-nav is the holder for all of the app. the root is loaded when a component is assigned to variable rootPage

if you observe the app.components.ts, the rootPage will be assigned with the component TabsPage.
When the rootPage was assigned, it looks for TabsPage, it is imported in the .ts file at the top.

import { TabsPage } from '../pages/tabs/tabs';

it was being imported from ../pages/tabs/tabs means, from pages->tabs folder it looks for tabs.ts file.
@Component is decorator which contains meta info like it view, providers etc.,
templateUrl tell what to load for tabsPage. so, tabs.html is loaded.

let us observe, tabs.html:
<ion-tabs>
  <ion-tab [root]="tab1Root" tabTitle="Home" tabIcon="home"></ion-tab>
  <ion-tab [root]="tab2Root" tabTitle="About" tabIcon="information-circle"></ion-tab>
  <ion-tab [root]="tab3Root" tabTitle="Contact" tabIcon="contacts"></ion-tab>
</ion-tabs>

ion-tabs is the directive which is the holder for tabs. it contains 3 ion-tabs which holds respective pages. [root] sets the root page for each of the tab.

so now 3 more pages will be loaded based on their paths mentioned in .ts files.

so i guess you got the crux of it. after app initialization, all the things works based on the .ts typescript files and respective html will be loaded from the templateUrl and styles are taken from respective .scss files.

that's it. to understand flow, i would suggest to keep console.log(); and serve.

Ionic 2 - Installation & installation issues

With ionic 2, the top level stack stays as like ionic 1 (internally lots of changes were) i.e. Cordova for communication with hardware, Angular 2 for javascript events and ionic 2 styles/classes for CSS.

so, installing ionic 2 also like ionic 1. Install nodejs & Install corodva, ionic.

  1. Download latest node.js from https://nodejs.org/en/
  2. run the command:  sudo npm install -g ionic cordova
thats it. you are done with the installation. 

sometimes, users who have ionic 1 are getting problems like, if you create a project it will get created some where else etc. for such, completely remove ionic and re-install.

follow the steps below (in mac):
  1. kill running nodejs via terminal: killall -9 node
  2. completely remove below folders
    1.  /usr/local/lib/node_modules
    2. /usr/local/include/node and /node_modules

thats it, run above install command to re-install ionic 2.